Monday, August 29, 2011

From grandma's kitchen to my bar...

i was thrifting at one of my favorite local shops when i came across this GREAT tray table set. it immediately reminded me of my grandma and a tray she used to have in her kitchen! i couldn't let it just sit there, it had so much potential. here's what it looked like when i found it:

the black with all those hideous gorgeous gold accents and flowers, dang. i knew i wanted it in the living room next to the bar, to hold napkins and the cocktail shaker, etc etc..so i decided to go with white as the background and figure out the design to to on the trays later.


i got a can of glossy white spray paint and also a can of primer, i wanted everything to come out evenly and i was afraid with the designs already on it, it would be too hard to get the white to cover evenly.


started by sanding down everything and you can see where some of the paint came all the way off, which is fine, my main goal was to just rough up the surface though.


taped up the wheels, i was planning to take them off and clean them up a bit, but when i realized that i had no idea how to do that or even what tool to use, i decided they were ok the way they were ;)


close up of paint before sanding


close up of paint after sanding, much smootha!


whole thing is sanded, sanding something with paint leaves a great mess


don't forget if you're sanding anything with paint or chemical additives (like varnish, etc) and/or spray painting all day, a mask is a good idea!! and i thought i'd give you people somethin to laugh at ;)


after the primer is sprayed on, i'd never used spray primer, i was surprised at how uneven the coverage was, but when i used the white over it, it was fine

ta-da! all-white with an olives design. i'm  a fan.

in place right next to the bar

top shelf

bottom shelf

storing things! i'll probably get some cute appetizer plates and napkins, stuff like that to put on there. for now it holds the cocktail shaker, my trusty wine chiller, some beer glasses, and drink stirrers. check!

Friday, August 26, 2011

George, George George of the Jungle, watch out for that tree!

the George of the Jungle quote is inspired by the initial purpose for this project. a good friend of mine had been living with a bay-window cushion covered in this hideous jungle print:


clearly she would like this re-covered with something a bit more modern and maybe even easier to coordinate decor with? so that's where i come in! she picked out all her fabric for the cushion, two coordinating pillows, and two couch pillows for her living room, and i went to work.

ripped all the fabric off


sorry that i did a horrible job taking pictures as i went, i had never done this before and i was concentrating more on getting it right.
this is when i had the front and sides sewn together, and i was measuring if the corners worked, and then doin a little dance because they DID!


finished! to save fabric (a lot of it, surprisingly) i used 3 pieces for the top of the cushion


to  make it removable without the hassle of having to attach a zipper, i made it envelope-style where the two sides of the back just fold over each other to conceal, but no zipper or buttons, and you can still remove it to wash the covering. it takes a little muscle to get it in and out, but i made sure i reinforced the two points on the sides where the two pieces meet so they wouldn't rip when removing the cushion


PILLOWS!


she chose square pillows, and since they'll be used a lot i thought envelope-style would make it super easy not only to clean but to replace if she wanted to change the look for cheaper next time. so here's how i did it.
-this pillow was to be 20"x20", so when you cut the fabric for envelope-style, you cut it for 21"x24". the extra 4" is for the fold-over flap in the back, the 1" of course is for seam allowance.

for the 24" length side, you cut that right in half.

then you have 3 pieces of fabric for one pillow

iron down a double-hem, 1/4"-1/2" works fine

pin down

SEW! get as close to the edge where it's folded over as possible to be sure you catch the folded fabric underneath

this fabric has a bit of stretch to it, so i found it was easier to keep it taut over the front of my machine to keep it from bunching as i sewed. not stretched- taut.

after you do this with both pieces of the back side, you just lay them on top of the front piece like you would if you were sewing a regular pillow, only allowing for a fold-over as well. right side to right side!

i pinned the fabric together in a few places throughout, not just at the edges.

sew the edges just like you would a normal pillow

back stitch a few times to reinforce the side points where the cover opens up to remove the pillow to make it last longer.

here's the pillow inside the cover without finished corners. i just like to make sure the size is right before i cut anything away!

flip inside out again, cut the corner diagonally

trim the edges coming away from the corners too, this keeps the fabric corners from bunching up and lets you get nice, pointy corners

pillow form that goes inside, on sale of course! ;)


ta-da! finito.

here's what the back of the envelope-style pillow looks like. so easy and practical! just the way mama likes it

Monday, August 22, 2011

There's a lady who's sure all that glitters is gold, and she's buying the stairway to heaven.


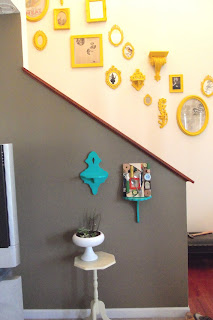
at this moment, i'm on top o' the world. i've finally finished the stairway project, got half of a big customer's project done today, and my fantastic husband made tacos for dinner. alrighty, stairway!! you saw in the last post that we had nothin' there and it was totally blank. i've been scouring thrift and antique stores, ebay, etsy, wherever i could find an interesting piece to add to the collection.

my idea was to use lots of different mirrors, frames, and sconces in a collection, and paint them all one color, to unify them as a single decor element. i chose yellow because the design was so risky (since it's not just me living here, and it's really super hard interesting trying to balance a decor that works for both sexes), and i thought most other colors would be too harsh and overwhelming, and white wouldn't be bold enough for the design. plus they only make so many colors of spray paint!

i did something a little different with the frames too, there are photos in a couple of them, but since we don't have kids and we don't have a lot of great display-worthy b&w photos of friends and fam, i used art, fabric, books, text, and even a map! i think (hope) it makes for a super interesting display that makes you wanna walk up the stairs to see what else is up there. anyway, here it is.


i'd never used an attachment like this for spray painting before but i'm tellin ya, if you are painting a lot, this little baby is necessary. right next to the spray paint @ walmart

i like krylon or rustoleum. this stuff wasn't fantastic on every piece i had for this project, but it mostly did the job.

i am fortunate to have access to a sweet spray painting booth, and my dad installed this turntable and he's got these little triangle guys that hold your stuff up off the surface, which is great because after spraying everything, i basically had a pool of sticky paint on the table

i arranged each item on the floor and printed a picture of it, and me and hubs set off for about 2 hours hanging everything. we didn't even fight about it, which is miraculous. i tend to get frustrated pretty quick when we're hanging things together, one of my many faults! i repaired the old frames that didn't have backing and what not, this is the 'before' filling them all in.


AFTER! tah-dah!

dictionary page from a set of dictionaries i have from 1948. variations of the word 'love'

photo of our view from the bed and breakfast room on the wine trip we took for our 1 year anniversary. goooooooood memories

awesome intaglio print done by an old classmate of mine from college. i L-O-V-E her prints, she is on the path to being a printer as we speak.

sweet candle holders and sconces! so fancy.

i especially love this. i got this meal sack from my grandpa, and it was real dirty, so i washed it, but then most of the color came out, so i was sad. BUT i think it works in this collection, it's not too bold to distract from the whole, but still interesting.

cute little mirror i found on etsy. it was white when i got it

i got an old mother goose book, i mean OLD. it's got a few offensive poems in it at this point lol.

found these gems on ebay. super cute

another article out of a 1936 Household Magazine. i'd like to eventually find a historically significant newspaper headline to use in this frame, it's square and a headline would look great in it.

wedding invitation looks great in a yellow frame!

love this fabric. it was a clearanced tablecloth at target!

one of my prints, it looks great in this bubble-glass frame

a map of our area. this one is so tiny but i think when you're looking at a large area on a map inside the small frame, it's a good visual contrast

screen prints of mine, big one is on fabric, little one is paper. the big one will probably be temporary until i find something more worthy of a big frame right at eye level.

view from the living room, this was a great way to keep track of the angle we were hanging everything at.

side note, i mentioned earlier that this was an awkward area, but now i think it's ok because there's so much other stuff to look at. i might put a little rug there sometime, mark the area visually as a place to put shoes by the door or something.